Featured at:
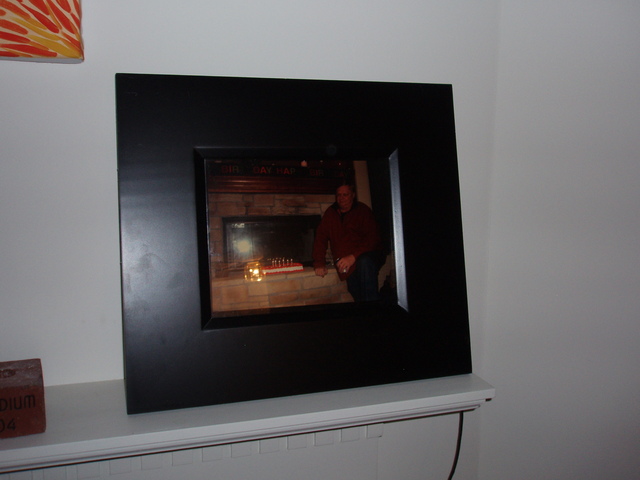
The goal of this project is to turn an old Sony Z505JS laptop into a digital photo frame with more features than a normal digital picture frame has. Plus, since I allready have this latop (which was free because I resurected it from a slushee incident) I can save myself a couple hundred dollars! Here is a preview of the final result.
Luckily for me, this laptop is ideal for digital picture frame projects. The only thing it really lacks is built in wi-fi...which wasn't much of a problem because I had a PCMCIA card. It also has a noisy hard-drive (which I address later on.
Specifications of the hardware:
Requirements:
The first task was selecting the ideal linux distribution. I had considered both Puppy Linux and Damn Small Linux and even installed them. However, I went back to Debian-based Ubuntu because I really wanted the ability to easily update and install software via apt-get. Also, I really didn't need a super tiny distribution because the laptop had a 10GB hard-drive.
I allready had a version of Ubuntu 7.10 (Gutsy Gibbon) installed on the system, following the general steps for a low-memory install. For this project, I didn't feel the need to install a window manager or login manager, but if you really wanted one, JWM and SLIM are good choices because of there minmal dependencies. I also installed openssh-server so I could access the picture frame remotely.
I decided to use FEH. It's simple and lightweight and flexible. I can be installed easily via 'apt-get install feh'.
Since one of the requirements was to run with no user interaction, I had to start X11 and run the slideshow software on boot. Because I didn't want to use either kdm or gdm I couldn't do auto-login (xdm and SLIM don't support auto-login. At first I tried to lauch X directly from the /etc/rc.local script, but I kept getting "Permission Denied Errors". I then tried creating a /etc/event.d/slideshow script and still received the same error. Finally, I found the secret on a forum. By default the 'x11-common' package is configured to only allow console users to start X11. By running 'dpkg-reconfigure x11-common' and selecting 'Anybody' I could now start X11. This is slighly less secure, but I'm not to worried about it. In the end, I decided to keep the event.d script and issue a start command via rc.local. Perhaps I will find a more elegant and correct way to do this some other day. You'll notice that the slideshow software runs as the slideshow user. You can add the user via the 'adduser slideshow' command. To actually start the slideshow software I used the xinitrc file for the slideshow user. All of my photos are on a NFS mount in /home/shared/Photos.
console output
script
   su - slideshow -c '/usr/bin/startx > /dev/null 2>&1' &
end script
initctl start slideshow > /dev/null 2>&1

exit 0
  # Disable EnergyStar Features
  /usr/bin/xset -dpms

  # Turn off screen saver
  /usr/bin/xset s off

  # Start the slideshow
  /usr/bin/feh --theme slideshow /home/shared/Photos/200* > /dev/null 2>&1
To make the laptop as quiet and power efficent as possible, I set the BIOS Power settings to be as conservative as possible. This makes the slideshow load a little slower on startup because I have 1000s of photos to load. I think this is an appropriate compromise, given the photo frame will only be power cycled every now and then.
The harddrive in the Z505JS is noisy, so I installed the laptop-mode-tools package. By default it essentially doesn't spin down the harddrive when on AC power (okay technically after 2 hours of idleness). Set the following two values in /etc/laptop-mode/laptop-mode.conf. Because I load all of the photos from NFS, the hard-drive is almost always idle. By default the syslogd program will put "-- MARK --" messages in your log files every 20 minutes. This will cause the hard drive to spin-up, so I also disabled those.
ENABLE_LAPTOP_MODE_ON_AC=1
NOLM_HD_IDLE_TIMEOUT_SECONDS=20
SYSLOGD="-m 0"
I took one hint from another DPF project. I set the backlight to go off at midnight and turn back on at 8 AM. This requires you to install the vbetool package.
# Tune backlight off at midnight
0 0     * * *   root    /usr/sbin/vbetool dpms off

# And back on at 8 AM
0 8     * * *   root    /usr/sbin/vbetool dpms on
To get the jog dial to work, you have to load the sonypi module. This allows you to use the jog-dial to go forwards and backwards through the slideshow. For some reason the /dev/sonypi device doesn't get the right permissions so you also have to configure udev. Add sonypi to the bottom of /etc/modules and then add the following file.
KERNEL=="sonypi", MODE="0666"
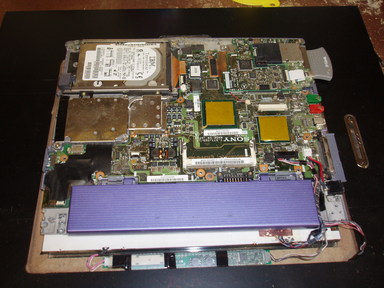
Once I had the software working as desired. I being tearing into the laptop. My goal was to fit it into a Wildwood 8"x10" frame I purchased at Michael's for $20. Basically just start tearing into the laptop. The only things to save are the bottom frame with the attached motherboard/harddrive/etc ,the hinges for the LCD, and all of the external electronics (mouse, jogdial, speakers, etc.). I didn't save the touchpad or keyboard...but you may want to.
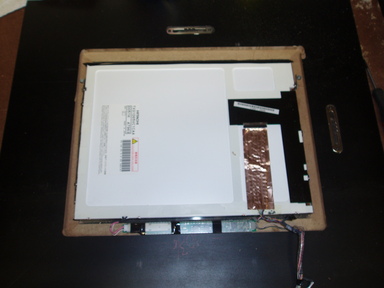
This is what the LCD looks like when extracted.

Because the LCD is slightly longer than 10" I used a router (thanks Matt!) to enlarge the hole in the picture frame. After that I cut the LCD hinges and used them to mount the LCD in the frame (look in the upper right and left).
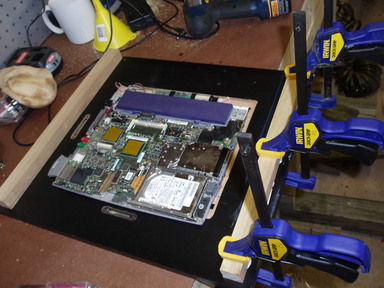
After that I attached the bottom piece of the laptop to the frame, using the existing holes in the aluminum casing. Note that I kept the battery attached, even though it is dead, because my laptop doesn't boot without a battery installed...your's may be different.
A few 1"x1" square dowels hide the laptop from being seen from the side. I didn't put them on the top or bottom to ensure full ventilation and access to the jog dial and port extender.
A few 1"x1" square dowels hide the laptop from being seen from the side. I didn't put them on the top or bottom to ensure full ventilation and access to the jog dial and port extender.
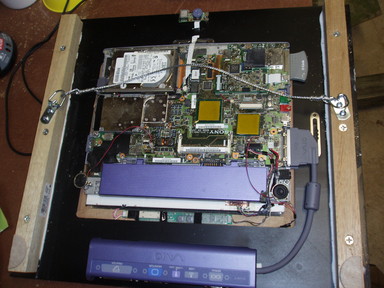
The finishing touches (photo coming) were to cover the hanging wire with electrical tape to prevent accidental shorts. I also added some support underneath the motherboard and behind it to make it more sturdy and to alleviate strain on the three bolts holding the laptop to the frame.